Laying a new hardwood floor is one of the best ways to enhance your home’s beauty, warmth, and value. Whether you’re updating a single room or renovating your entire house, learning how to lay hardwood floors properly ensures a professional look and long-lasting performance. This step-by-step guide will walk you through everything you need to know to get started with confidence.
Before anything else, preparation is key. Begin by choosing the right type of hardwood floor for your space. Solid hardwood is durable and can be refinished multiple times, while engineered hardwood offers greater stability in areas with humidity or temperature changes. Once you’ve selected your flooring, allow it to acclimate to your home’s environment for 3 to 5 days. This prevents warping or gaps after installation.
Next, prepare the subfloor. It should be clean, dry, and level. Remove any old flooring and thoroughly vacuum the surface. If your subfloor is concrete, make sure it’s completely cured and consider using a moisture barrier. For plywood subfloors, check for squeaks and secure any loose sections with screws. A smooth, even base is essential for a flawless hardwood floor installation.
Now it’s time to plan the layout. Decide on the direction of your floorboards—laying them parallel to the longest wall often gives the room a more spacious look. Measure your space and use chalk lines to mark guidelines. This step helps you stay aligned and avoid awkward cuts at the end of rows.
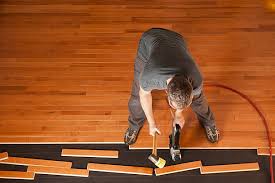
Start laying the first row along your starting wall, leaving a 1/2-inch expansion gap between the wall and the boards to allow for natural movement. Use spacers to maintain this gap. Depending on your flooring type, you’ll use either a nail-down, glue-down, or floating method. Solid wood typically requires nailing, while engineered wood may use adhesive or a click-lock system. Whichever you choose, follow the manufacturer’s instructions carefully.
As you work across the room, stagger the seams between rows to create a natural, random appearance. Use a flooring nailer or stapler for nail-down floors, and make sure each board is tightly secured before moving to the next. Don’t forget to check for level and alignment regularly. A straight installation will ensure your hardwood floor looks polished and even.
When you reach the final row, measure and cut boards to fit, maintaining the expansion gap against the wall. It may require trimming boards lengthwise using a table saw. Once all the boards are in place, remove spacers and install baseboards or quarter-round trim to cover the gaps and give your new floor a clean finish.
Finally, clean your new hardwood floor with a dry or slightly damp microfiber cloth. Avoid excess water, as it can damage the wood. Depending on the finish, you may also apply a protective coat or sealant for added durability.
Laying a hardwood floor takes time and attention to detail, but the results are well worth it. With the right tools, preparation, and patience, you can achieve a stunning, professional-quality floor that adds elegance and value to your home for years to come.


